No phishing for me, thanks

This was originally written in February 2020, but the concept still applies.

Ping! Your cell phone makes a noise and you check who the text message came from.

We’ve all been well trained to keep our phones nearby and to check and respond quickly to text messages. Once in a while, instead of it being your friend, spouse, parent or child, it’s a scary warning from your bank, or the tax department telling you to contact them because something has happened to your account. At this time of year in Canada and the US, we’re all on extra alert, and some cool headed thinking can prevent great financial losses.

Identifying a scam

Text messages are a great addition to our list of communication tools. If I’m in the grocery store and my wife wants me to pick up a few more items, I’ll tell her to send me a text with the list – don’t call me as I’ll forget as soon as we get off the phone! However, as with any helpful tool, there is always someone who finds a sinister misuse for it. It’s not uncommon, especially during the tax season to get a message like this:

Message 
Yesterday 9:1 2 
You have received $493 
from the Canada Revenue 
Agency last year for your 
taxes. Please fill in the 
following online form:

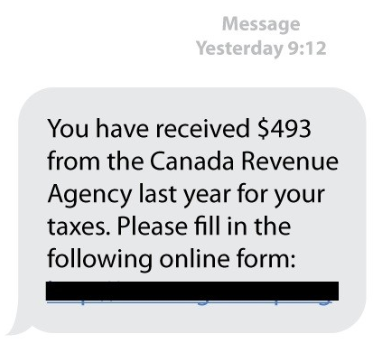
There’s a common pattern in scam messages, also known as phishing (as in fishing for information). The scammer wants to either scare you into action or promises you some reward – like the supposed $493 from the Canada Revenue Agency. These types of texts will have a link that, when clicked, appears to be a trusted organization like your bank. Do not click on these! You will be asked for your user name, password and possibly other private information. The scammer will use these to steal your banking or other financial resources.

But not all texts are phishing

The banks and other financial institutions have also started using text message alerts as a notification system. But how do you tell the difference? Have a look at this message:

TD FRAUD ALERT Purchase 
$58.34 @ SKIPTHEDISHES.C 
Credit Card ** 16 Reply Y if this 
was you/your add! Cardholder, 
N if not Msg rates may apply

In this message, it appears to be coming from TD Bank and is asking if you spent a specific amount at a specific vendor. It asks you to respond either with “Y” that you made this purchase (and all is ok) or “N” for no that you didn’t make this purchase (and all is not ok).

The difference – in the scammer text, you are asked to provide your personal information. In the second, you are only being asked to confirm or deny information. At no time is any personal details exchanged.

So, now you know that scam messages will ask you to click a link, or call a phone number. Notification alerts only ask you to confirm or deny information. For any type of alert where you are not sure, you can call to a known phone number from your bank and find out if the alert is true or not. By understanding the different types of messages you may get, you will always be in control and have the right response.

Sometimes it looks like a scam but it’s not

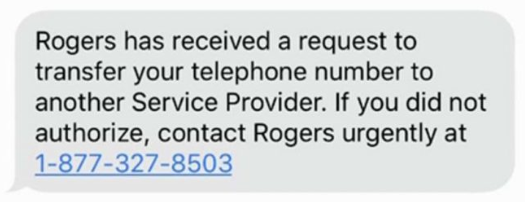
Recently I read about a new scam going around – scammers attempting to port phone numbers illegally:

https://www.680news.com/2020/01/25/woman-targeted-in-new-type-of-cellphone-scam/

In this scam, the scammer was able to determine just enough personal information about someone that they could call the cell phone provider and have the number moved to another provider. A text message was sent to their phone but the original owner either didn’t see it in time or thought it was a scam – a valid response based on how’ve we’ve been trained to react.

Rogers has received a request to 
transfer your telephone number to 
another Service Provider. If you did not 
authorize, contact Rogers urgently at 
1-877-327-8503

Once we have been trained to ignore what seems to be a scam message, what should a cell phone owner to do with this new information?

When you receive what appears to be a phishing text, if you aren’t sure if it’s valid, contact your bank, cell phone provider or whichever company is referenced. Do not use the number or website in the text! Look it up either through your contacts, the back of your credit card or through the provider’s official website.

Most mobile phone providers in the US offer blocks to prevent your phone from being ported unless you provide them with a pin number that you set up. The following article explains this process https://www.thebalance.com/prevent-your-mobile-number-from-being-ported-4160360 and you can call your Canadian (or other) provider to find out if they offer such an option

Always be vigilant

This tax season while you are busy enough getting all of your papers and files in order to submit your taxes, it’s more than likely than before that you’ll get phishing texts or phone calls from scammers. Remember that the tax agencies will never call, text or email you with threatening messages. You can always call them at officially listed numbers to find out if there is indeed a problem. When the inevitable scammer comes calling, take a breath, think about your options and then make the right decision to shut them out.

How I backup and store multiple copies of my pictures and videos

In a previous post, I talked about a folder structure for storing pictures and videos. Now let’s look at the methods I use to do the following:

  • create additional copies of pictures and videos at home
  • backup pictures and videos online

The primary copy of my pictures and videos is located on an external hard drive that is generally connected to my laptop computer. This makes it easy to bring it anywhere but if something were to happen to the hard drive, such as losing it or having it fail, I would lose everything. That is why I have multiple copies.

Copy to another hard drive at home

A few years ago, I set up a device similar to this one. It is a Network Attached Storage (NAS) device. This is a device containing a few hard drives that does not require a computer. It provides hard drive storage space on your existing network.

During the writing of this article, I reviewed the settings on my NAS. When I logged in to check it, I discovered that one of the hard drives in the NAS had failed. This NAS device was configured with 2 hard drives, each 2 TB in size. The NAS is set up as RAID 1, which means that the hard drives are set up to be clones of each other. This is transparent to the user – when you copy files, it keeps the drives in sync. It was just a matter of purchasing a new hard drive, telling the NAS device to detect it, and then it automatically copied all of the data from the good drive to the new one. Having a system like this gives you extra protection from failure. With hard drives, it isn’t a matter of if the drive will fail – it’s when it will fail.

Below is the display on my NAS device showing the failed drive.

It is important to note that I should have known about this failure. This NAS device is set up so it can send emails to notify about problems like this. My email password had changed and I did not update the NAS device. Keeping on top of dependencies like this is important!

Keeping the NAS device in sync

I use a program called FreeFileSync to sync up my pictures and videos from the external hard drive connected to my computer to the NAS device on my home network. This can be either run on demand or scheduled to run every so often. What I like about a sync program is that it only copies what has changed, not the thousands and thousands of pictures that I have. The combination of my external hard drive and backup to the NAS drive means that I don’t have to worry if while I’m out that something happens to my photos and videos.

[a screenshot of FreeFileSync will go here]

Online Backup

But what if the NAS drive fails? That’s why we need to backup away from the primary location, which in my case is my home. There are many different online backup services and I’ll have more to say about how to choose and what to choose in a future posting.

My Method for Organizing Digital Photos and Videos

This article was first written for my other blog in 2018. Much of my process is the same. I will eventually update this with a few updates.

As you keep filling up your phone with pictures and videos and then occasionally copy them to your computer, you must be thinking, I must organize my pictures. This method is also very effective for backup purposes as it leads to an easier way of getting all pictures and videos backed up. More about that in a future post.

Folders on My Hard Drive

My main computer is a laptop with a relatively small hard drive. There isn’t enough room to store all of my pictures and videos going back many years. I purchased an external hard drive, similar to this one. Within the hard drive, I set up a folder structure:

You’re probably wondering how I have folders going back to the 1920s – there were surely no digital cameras then! I use these folders not only to store pictures taken now but also scanned pictures. This simple year method allows me to keep all pictures, regardless of where they originated.

Within each year folder, there are subfolders for each month. For example, in 2017 the structure is as follows:

Then, within every month, there is a series of folders and pictures. If there is a specific event, such as a birthday party or and outing where I took a lot of pictures, I would create a folder there. If I have just a couple of pictures that were taken while out, they are put in the folder for the month. This short amount of time spent figuring out how to organize your pictures is well worth it in the long term when you want to find them!

For example, this is the folder for July 2005. There were several event where I took pictures such as a wedding, or in the cases of folders labelled like ‘weekend 15-17, it’s pictures from that weekend. The remaining pictures are others that were taken that month that didn’t warrant specific categorization.

You will also notice that the pictures are named a certain way. The method I generally use is to name the file based on who is in the picture and/or where they are. Also, when I say picture, a short video taken with my phone would also be included in the same folder where pictures are stored.

Scanned Photos

As for scanned photos, the storage method is identical. If I have a collection of pictures from August of 1962, I will scan them and create the appropriate folder structure. In some cases where I don’t know the exact year, I have created folders such as ‘1960s’ and then keep the pictures there.

Other Categories of Photos

If you look at my year photo structure from earlier, there are 2 additional folders listed:

  • Family pictures
  • scan

In any way of storing pictures and videos, there are always exceptions. In my case, as part of my genealogy research, I also have collections of old photos that I don’t want to store in the year/month/event method. For these, I keep the ‘Family Pictures’ folder where I can store pictures based on other categories.

The ‘scan’ folder is where I keep scanned photos that haven’t yet been categorized and placed in folders.

As you develop your own storage system, you will find a system that works for you. The key recommendation is to keep all photos in a common folder structure as it makes backup and copying much easier.

Next time we will talk about making backup copies of your pictures and videos.

How to log in to student school wifi for York Region (YRDSB)

I haven’t written in this blog for a long time. I’m shutting down another blog to consolidate my writing to one place. For some reason, this one post on my other blog got lots of hits. Even though it was written in September 2019, as of April 2026, it was still being found. Clearly YRDSB hasn’t made it easy to connecto their wifi. So I’m reposting this here in the hope that it gets found by others

My daughter started in grade 9 at Westmount Collegiate Institute in Thornhill in September 2019. Trying to find the right information to connect to school wifi proved to be quite difficult. There is nothing online that tells you how, or if it’s there they’ve hidden it really well. My son has been in the York Region school system for a few years and must have somehow figured out how to connect as his Chromebook connects. We ended up going to the school with both Chromebooks and I checked the settings of the one that does connect and entered the right information and it worked.

The directions below are for a Chromebook but should work for any Windows or Mac too. The field names may be different.

To save others the same trouble we went through, here is what you need to fill out on the wifi settings.

  • First, make sure to connect to the YRDSB-S wifi network.
  • Choose EAP security, EAP method PEAP.
  • You may be able to choose automatic for EAP Phase 2 authentication but I saw that it used MSCHAPv2 so selected that.
  • Do not check for Server CA certificate
  • Identity is your 9 digit student number
  • Password you should already have for Google Classroom

Click Connect and you should be good to go.